Sunday, November 30, 2008

Why Are Chelsea Charms Boobs So Big?

-Part I

Having done enough work on the chances of your blog it's time to investigate how we can configure and manage the blog we've created.
Let's start with the Settings tab . To access it below presents a submenu with the following possibilities: Basic
: Allows you to change certain parameters such as the blog title, description, if we let our blog be added to the lists accessible to everyone, whether search engines can index our content or even delete your blog. Publication
: For meido of this option can change the name in the subdomain of your blog. That is, if we have a blog in which the address is:
http://blogdereinaldo.blogspot.com because we can change the subdomain blogdereinaldo different one, just remember to be lowercase and do not use strange characters like our ñ, symbols like "," interrogation, exclamation, tildes, etc.
Format: This option allows you to change some features of the presentation of our blog as the number of entries to display, the format of the date of entry, entry date, time format, time zone, language .. .
Comments: This option and saw a previous post. File
: our chance to change our rate of archive months, weeks, days, or without providing indexing laterla menu. Site Feed
: With these options you can configure the way that we can offer content syndication of our blog.
Email: With this option will get sent to a maximum of 10 email our blog. We may also indicate the email we send news and images for publication.
OpenID: to make changes on our identification in areas where permits. View the Wikipedia link.
Permissions: You can add authors (up to 100) to our blog and also filter your readers (up to 100) from any to just the authors.

Wednesday, November 26, 2008

Gifts To Get For Stroke Patients

Some interesting links on blogs

Presentations:
Education Blogs and Nestor Alonso. Presentation

Videos:

Blog in Inglés plan

Resources: Workshop
and resources for blogs
Blogger Official Blog in Castilian
Utilities and resources for your blog.
advice blog All for your blog . Utilities
Blogger Templates
More templates for Blogger
ublish delicious links
Insert images
Bubbleshare Creating widgets for Blogger. Article
Help official website. Very detailed and takes into account the different levels of user @ s

Tutorials to create Blogs:
Guide blogging with Blogger and Wordpress . in Aulablog21
crecaión Guide posts to Wordpress. Archicad zipped
Ana Ovando Tutorial . Presentation

Videotutoriales;
Blog Creation and publication of the first item with an image.
lbarroso
Using the visual editor. . Lbarroso
Customizing blog. Graphic tutorial. Configuring
lbarroso Blogger. Graphic tutorial.
lbarroso inserting a YouTube video or Dailymotion lbarroso

Tuesday, November 25, 2008

Patches Flaky Skin Dog

Task 9: Insert PDF

One way to offer and share documents prepared and models in the word processor is a repository and upload them to put a link to it. The problem is that choose the format that can complicate the lives of our readers as they may not be appropriate to read herrameinta.
is why some repositories have emerged to overcome these problems and take a file and delivered using Flash technology very showy. These applications are Scribd and Issuu .
The former only allows us to upload PDF files and the second gives us the ability to upload different file types (DOC, PPT, PDF, XLS ...). You can see both tutorials using the following links: Issuu Tutorial Tutorial and Scribd.
You can see an example of Issu and another example Scribd .

Insert a document from Issuu:
Step 1. Go Issuu.
Step 2. Search document
Step 3. At the top of the document is the EMBED option , sink into it and Copy the code form field.
Step 4.
Paste the code into the entry with the Compose tab selected.

Insert a document from Scribd:
Step 1. Go to Scribd .
Step 2. Find the document.
Step 3. At the top of the document is the EMBED option , sink into it and Copy the code form field.
Step 4.
Paste the code into the entry with the Compose tab selected. (You may have to modify the text area that includes the code)

How To Keep Weave Hair From Tangling

Task 8: Audio

To perform this task should have reference to the blog post with the title of Insert audio on the blog. There are many repositories
audio (sounds, music, narration ..) we're going to try with three sites so you can watch how to look for the embed code. These sites are:
RADIOTECA: . Site where you can access many educational audios.
Goear . Place where we can look up audio and
Odeo. To search for music audio, it also allows up.
Radio.blog.club . Offers an extensive database with all kinds of genres, with the ability to search by both authors and works.

First, of course we will create an entry for the audio to show context. However that has been around the International Day Violence against women (November 25), we will create an entry on that day to encourage hearing and that students approach also contributing lso opinions through comments.

So once you open the new entry write a brief introductory text on 25 November to then insert the audio. To do this go to RADIOTECA . In the menu area (left) chop with the mouse on the option GENDER AND SEXUALITY. This will display the submenu and choose sopciones arising mouse Violence Against woman. This means that in the central area are deployed audios have classified under this category. Each audio is presented with its title and a number of details (text report, production, country, language, format, theme, sub ..). On the right we have a panel with some controls reproduction and other technical details. Also with the ability to download audio, think about it, recommend it and place it on your website.
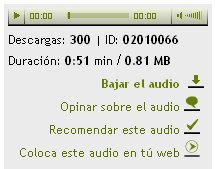
As we want to do this last because we split on Put this audio on your website. To bite on that option a window appears with the possibility of taking the code. It shows two codes, the first allows us to have the player on the blog and the second to put a link to the website that appears audio.
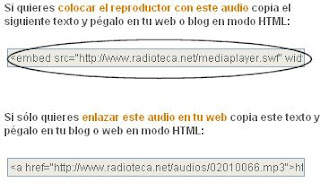
So select the first option clicking with the right mouse button on the field that has the code and selecting Copy.
With this we go to the post you're composing, select the Edit HTML tab, go to where we want to bring up the audio player and with the right mouse button or select it in paste (CTRL-V). Thus
and we inserted our player. We end the inning pidendo to our visitors to state their opinion on what is heard. We recorded the entry and see how the result has been thereof.

we could come Goear and Odeo. In these cases we look for the audio input text form field that appears at the top. Once the selection arises oferce we choose the appropriate by clicking on the title and another screen will appear with full information of the audio with their hearing and the possibility of taking the code to embed in our blog. This code usually begins with the sign "OBJECT <" seguido de and the rest of code in both srevidores mentioned. So the procedure is the same as for RADIOTECA.

Finally we can put audio Radio Blog .
1. Navigate to Radio.blog.club
2. Use the search engine that offers you to find music that interests you. Once you locate the file, click on the blue button to display the player code on the right side of the screen:


3. You can customize the player by changing the body color, border, button and text. When you are to your liking select the code and copy to the clipboard (Ctrl + C or right mouse button and select Copy).
4. With the code is copied to the post you're composing, select the Edit HTML tab, we to where we want to bring up the audio player and with the right mouse button or select it in paste (CTRL-V).
5. Save the changes, see the preview and / or publish the entry and displays the blog-inlet.

Monday, November 24, 2008

Oklahoma Driver Licence Number With A Letter H

Insert Insert audio on the blog

Another possibility to give life to blogging is to insert audio . This opens the way for us to integrate their own auditions ( mini-lectures, exhibitions, poetry, stories, stories ...) but other products already developed by third parties.

The process by which we record audio, upload to a server and allow it to be syndicated and embedded on a blog, wiki or web page , Is called PODCAST or PODCASTING . I
leave this link on how to make a podcast and that other to count him lighter. Also I leave this very complete tutorial formats conceptual map of Lourdes Barroso.

audio file that we will be mainly used in audio and music servers. So it will go to these places where to search or to upload your creations.

The first step will then go to one of these servers to find audio files. Because there are several of them because I enumerate a few:
RADIOTECA : . Site where you can access many educational audios.
Goear . place where we can go and search audio
Jamendo. To find music
Classical Music. Only classical music formats ogg
FindSounds . Sound only
Radiola. Place to find recordings s stories, ads, etc..
Odeo. To find audio music also allows you to upload.
Woices . Another place to get on and off echoes (phone recording)

Once we have decided the place, sailed up to him and try to find the audio in which we are concerned. There is usually a form field where you enter the title search. Then if the file will present a search result in which there may be multiple. We access the desired file by clicking the title or some other graphic elements that will present the information and of the audio. Now is the time to listen to then we should find the code you need to inlaid on our blog. As you have experienced the code should start, most part of the time, with the clause EMBED OBJECT or . Copy this code (right click, copy) go to our blog and the insert from the tab "Edit HTML " the desired location. Save and tested.

These are the essential steps.

Sunday, November 23, 2008

How To Look Like Dahvie Vanity

Task 7: List of links

Another powerful tool is offered by Blogger possibility of adding a simple and easy a series of links to other blogs or websites page so that only we can tap on them to move, and take a look. It's a way to offer our visitors a selecicón of blogs and web pages often more interested.
This possibility is reflected in the Administration area blog, select the menu " Design" and within it the " Page Elements." Once in this screen, we see that we offer an outline of the template you are using.


then chop the Click on "Add a gadget (element). This will cause the emergence of a window where you can see the supply of components and utilities that supply Blogger. We must find " List Blogs" or " Links List." Although the two are similar they differ in that the first utility is directed to submit the blog and has some different characteristics from the second option that is intended to add only web pages.

If we choose the first option by clicking on the logo or name of the utility presnete us another screen like this:

Fill the different fields of the form
beginning with the title to be given to the section, the shape we are presented sorted, what blgos be shown, and other cararacterísticas as Icon, Title newest item, etc. Later we click on the " Add a blog to your list " and we will put the blog URL chosen, contacted him and will take the name of the blog, which then can be changed.
Once we have completed to register the different posts allowed, by clicking on the button "Save " we all saved and placed in the sidebar or footer area, as we chosen at first.
Later, if you wish to make edits, high or low, you can edit the gadget.

If instead we want to introduce the gadget "list of links " proceed in the same manner except that the options are more limited, only the section title and later the title of the web and the address or URL of it. Here you see the screen that appears:


Once saved, we place the item or gadget in a different area to where it exits, only to drag the column systems up or down will succeed put in place and order you want. We can add as many wish lists, each with its list of links.
To change it, open it by clicking the edit from the modification area of \u200b\u200bthe template.

Wednesday, November 19, 2008

Show Multilpe Webcams

Task 6: Comments

Another relevant aspect of a blog and give it life are the comments. There are blogs where entries are dozens of comments acompaladas. this is due to the relevance of the author and his followers.

education in our blog you must be even more because one of the issues we want is that certain news or opinions to our students and faculty can participate by expressing their feelings and reasoning. In fact it is common practice that the teacher will explain in an article in an issue on which the students must shed its opinion despuñes a debate.

We only enter the General Settings menu, there we have the sub COMMENTS. There are several options to highlight the most important
  • Show / Hide Comments
  • People who can comment: Anyone registered users, registered users of Google users and members of the blog. Comment Moderation
  • : always, after a few days, never
  • Email
  • notification
Verify that this option is enabled "People who can comment: Registered users" . And keep it, if it was not. This will allow for comments to all users with Gmail and Blogger registration. But we can leave the choice of any and enable comment moderation or activaractivar the box "word verification" to avoid spam or not to enable comment moderation. Moderation can not be published until the blog Administrator must not give permission. It is interesting to fill the field of e-mail notification every time the system reaches a comment send us an e-mail notice.
In short it is something that must decide and that you can change according to your experience when ye will come.

We must also remember that when we create an entry can enable or not the comments on this entry.

Comments may be deleted by the administrator of the blog from the Create Menu Entries, selected Moderate comments. You will see a list of all comments that have arrived, published or not. from there on you can delete any of them.

Now is the time to post comments to this blog and teammates.

Tuesday, November 18, 2008

Meguire Wax Vs Turtle Wax

Task 5:

Content syndication is a matter of vital importance in the digital world in which we live because we can keep abreast of what's happening in the world and our place dear. This is because the information did not travel but she will travel to us and then decide to go there for more complete our knowledge about it.

do not have to visit every day our favorite blogs just need to give us high on a page that lets you embed content syndication from various sites. These include: Google Homepage , Google Reader, Bloglines etc. Yambio is possible to FEED aggregator on your computer with programs installed on it. This is the great invention of what is called Syndication, or RSS. For more information

an excellent article in the journal CONSUMER.

to syndicate a blog using Blogger we proceed as follows:
1) Go to the address range of the naveador. You'll find an icon ( ) page of this blog. Pica in and find him and aprecerá " Subscribe to: Course coeducational Journals (Atom) " and " Subscribe to: Course coeducational Blogs (RSS)" , click one of the two options and a window opens in which all entries presnete. Copy the URL of the page you just entered.
2) Go to the administration of your blog and click on "File", then "Elements of a page." "Add an item" to be in this case a FEED. Paste the address you copied and hit continue. Already see what will appear on the blog. Guarda. The item has been added to the sidebar, you can drag the mouse to make it appear above or below your choice.
You can see how this blog is syndicated news wings CEP de Granada. Thus

if you see the blog will notice that on the right side there is information on the latest entrdas of this blog.

This can be done with any website that observe the icon referred to above.
But the best is to have the FEED own website in which we organize our interesting sites by category.

Is It Normal To Have Blotchy Hands

Syndication Task 4: Embed a video

Let's write a new post but in this case should accompany the text with video.
To do this we have two options: either leave the link for the video to look at the original place where it is stored or do that can be viewed in our own blog. Us and we will do this by selecting the latter option.

Videos that we will use will be stored in containers or servers as YouTube, Google Video and Dailymotion . There are others like and Delealplay TeacherTube. From any of these services how to insert the videos is the same.

So first think of some event or events that are going to communicate and seek first video on Youtube.

Once searched, create a new entry, write some text about what we offer and insert the video as described in the information dedicated to it and entitled: Insert Video on the blog.

Finally we can complete with more text or otherwise "Save as Draft" or "Post."

Vlc Problem With Undf

Insert video blog on the blog

The video today is an irreplaceable resource to present and transmit stop and awareness. Let's see how
offer video on our blog. To do this we have two options: either leave the link for the video to look at the original place where it is stored or do that can be viewed in our own blog. Us and we will do this by selecting the latter option. To insert videos

can use multiple servers that host as YouTube, Google Video , Dailymotion , Delealplay and TeacherTube . From any of these services how to insert the videos is the same. We are going to learn it from YouTube.
Youtube is a server where we can not only search for videos related to the topic that we are working but we can upload and share them with others so they can benefit from our work and thus facilitate his.

first sail in a different tab or window to which we have our blog. We arrived YouTube (click here), and note that the screen there is a search field
p where we can search video released by the name that the user has been registered by the words of the title and the tags or labels, so if in our case co-ed looking for something that is the words on the field or related to it. Once written the word or words to give the button "Search" we are presented with a list of results. You can try searching with different words or terms as in the search engines (eg + primary coeducation, "coeducation in secondary coeducation + course ...). You can see that I parked video listings. All of them are accompanied large numbers and information: title, description, tags (labels), date, user and number of times you have viewed.

From the video list it to appear, if we click the thumbnail of the video title or exhibit the same playing together with other data and information on it. One of them is the URL that matches the address that appears in the browser address field and field gold is the EMBED or INSERT. This is what interests us. So chop at once with the left mouse button is selected (changes color to blue background) and it will itch with the right mouse button opens a popup menu and select COPY.
to insert it into the blog create a new entry, if we have not already created, click on the tab EEdición HTML "and paste the code (right click, Paste, or CTRL-V). Then we return to the tab" Compose "and type the text Terina to accompany you, if necessary. If we click on "Preview" see what it looks like the entrance.


I offer some links that best complete these explanations:
Then here's a sample video embedded:

Sunday, November 16, 2008

Matula Herbal Formula And Reviews

Task 3: Adding images and links

Let's create a new post. In this case we will insert into the same image and several links.
The content is coeducational deal on the web sites to visit on your page.

To find links to blogs coeducational can access some of those submitted an entry in this blog or go to Google and search for blogs coeducational, for example.
The structure of the body text and links will have an introduction by a bulleted list. You must also accompany the entry with an image that is already on the web.

This post should visit the following:

Severe Headache 38 Weeks

Make links

Another feature to which we accessible on our toolbar is to embed links in our driveway. Linking is an essential function in a blog. Rare is the entrance. This function is performed by pressing Link:
To insert the best is to write an entire entry of the post and then start to add the links (link) that we decided to present. To do this:

  • The first thing is to see where we want to hook into the browser address bar and copy it, or, putting up the link, right click mouse select copy.
  • Then go to the post we're doing and mark the floor where we make the link, go to Link icon and paste the address (with the "paste" or CTRL + V)

Installing Pokemon Red Ti 84 83

Insert images

To insert images in our driveway so we only use the button
But first locate the cursor in the place we want to insert.
Once we decided to insert the image click on the button above and we get the following screen:


We then have 2 options: upload a picture from our team or direct an image already on the web. According to decide to select the appropriate area of \u200b\u200bthe screen.

If the first option (from our team), click the Browse button, locate the file on the hard drive of your computer and will fill the field.

If the second option (from Web) we have copied the address (URL) of the image to paste into the field labeled URL. To perform this step when we see only the screen image, copy the web address bar of your browser. If accompanied by more elements we get over the image, right click properties ask, mark and copy the address.
In both cases we select the alignment and size, both options at the bottom of the screen.

Once these steps have to click on the Upload button image. In this way and after a few moments we will present another screen with the selected image and the Finish button we inserted image in the blog.

say that sometimes you do not insert the image in the right place to do it's best to go about it pit the right mouse button, select cut, go with the cursor to the area you wish to place it and biting again in the right- mouse choose Paste. Thus we have the image where we want. Once uploaded

may be adjusted by pressing and pulling up the edges. We should never try to upload large photos. One solution to this is the program Snipshot .

programaque Snipshot is to modify an image from the Web or your hard drive. Resize, crop ... A good profit online, without having a program on your computer to do so.

Yello Wood Finger Board

Task 2: Insert

After creating our blog, Blogger invites us to create our first entry or post.
To do this it is best to present and explain the use to which it wants to give to your blog. Do not forget that blogging is not extended, but be concise and clear.
By accessing the ticket creation screen offers a form with three fields: title, body text, images and multimedia label field.


The second field is the largest and has a menu bar options. It works like a small word processor with options to select:
  • text font size font
  • Style: bold, cursova, color, web link
  • Alignment: left, center, right and justified
  • Lists: bulleted and numbered
  • entercomillado
  • Block Check spelling
  • Add Image Add Video
  • Delete the selected format
There are also two tabs in this area: HTML Editing and Writing . It is advisable to have chosen the latter. The preview us entry as published in the blog.
Finally we fill in the label field . these are used to organize information blog, that way we can find information more quickly and effectively. It also serves to ensure that our visitors have an idea of \u200b\u200bthe issues is our blog.

sopciones Another of the editor we offer is called input options that will give us the option to give permission to comment or not. change also allows the date and time of entry.

So once written input can see a preview and if we decide to publish it by clicking on the Post Entry button . If we see not yet be published because the store by selecting the option Save Now .

This is the year we will perform.

Vexilarfor Sale Nov 2010

input Task 1: Create Blog Blogs

To create a blog on Blogger must perform the following actions:
  1. Go to www.blogger.com address
  2. Select Create your Blog Now Create a
  3. Edit Posts Blogger account, you need Direction-mail address and password
  4. Choosing the title
  5. Blog (after change)
  6. Choose
  7. Blog URL
  8. Select a template

This develops direction I offer these steps in detail: Notes on blogs , Alejandro Valero .

visually to follow these instructions can access this tutorial de Lourdes Barroso or access your wiki edublogki .

Pidgeon Toed Actresses

Clarification of some concepts

Some basic concepts :
  • Blogger: Author of blog, English, Entry
  • blogger or post : Unit blog post, every new piece of information the author included. Post
  • : Write and publish a post.
  • feedback or comments : Texts that can write blog visitors about a particular post.
  • Permalink: Permalink. Is the URL or address that is assigned to each entry in the logbook, which should be used to bind.

Can You Get Std Bye Being Fingered Or Kissed

Places to create

can open a blog in several places: This article ñblog shows often enough but those who take the palm are
We'll create a blog on Blogger. Blogger is a website that offers free blog belongs to the world Google .

Simi Garewal Without Clothes In Mera Naam Jokar

Some tips

Before creating our blog I recommend you read some tips :

How To Build A Woodstove


Some examples of educational blogs:
Finally some examples of fun formatoi blog: